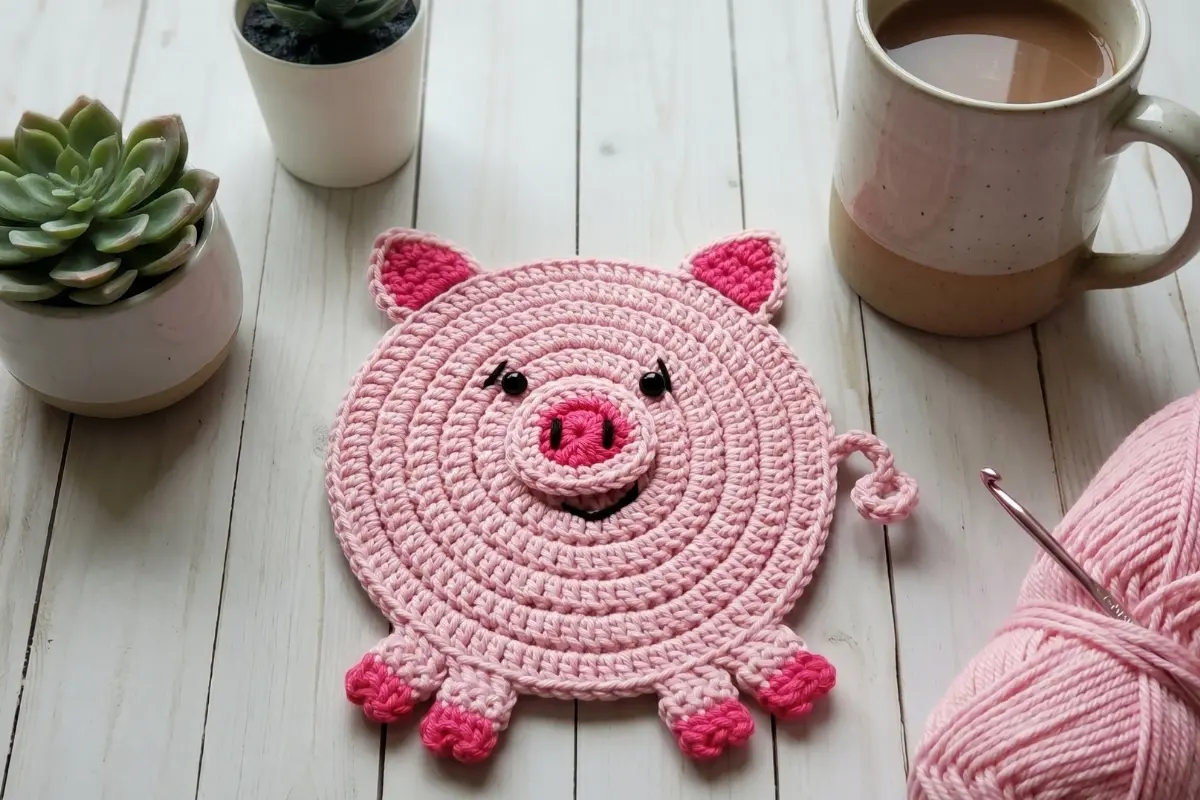
There’s something extra special about handmade kitchen décor, especially when it comes with a little personality. This Crochet Pig Coaster Pattern is one of those projects that instantly makes a space feel warmer, happier, and just a little more playful.
With its sweet round face, tiny floppy ears, curly tail, and soft pink tones, this pig coaster is the kind of crochet project that makes people smile the second they see it. It’s perfect for farmhouse-style kitchens, cozy coffee corners, craft fair tables, or thoughtful handmade gifts for animal lovers.
The best part? This pattern is beginner-friendly while still being relaxing and satisfying for experienced crocheters too. The rounds are simple, the shaping is easy to follow, and the finished result looks absolutely adorable sitting under a mug of coffee or tea.
This crochet pig coaster pattern is written in standard US crochet terminology and includes detailed instructions so you can confidently recreate every tiny detail.
Pattern Information
| Detail | Information |
|---|---|
| Skill Level | Easy |
| Finished Size | Approximately 8–9 inches wide |
| Crochet Terms | US Terms |
| Construction | Worked in joined rounds from the center outward |
What You’ll Need
Before starting your crochet pig coaster, gather your supplies and favorite yarn colors.
Materials
- Worsted weight cotton yarn
- Light Pink
- Dark Pink
- Black
- Crochet hook: 4.0 mm (G/6)
- Stitch marker
- Yarn needle
- Scissors
- 8 mm safety eyes (optional)
Cotton yarn is highly recommended for this project because it helps the coaster keep its shape beautifully while also making it more durable for everyday use.
Abbreviations (US Terms)
| Abbreviation | Meaning |
|---|---|
| MR | Magic Ring |
| ch | chain |
| sl st | slip stitch |
| sc | single crochet |
| inc | increase (2 sc in same stitch) |
| st | stitch |
| rnd | round |
| FO | fasten off |
Pattern Notes
A few small details can make your finished crochet pig coaster pattern turn out even cleaner and more polished.
- The coaster is worked in continuous joined rounds.
- Join each round with a sl st to the first sc.
- Ch 1 does not count as a stitch.
- Use a stitch marker to keep track of the first stitch of each round.
If your coaster starts curling slightly while crocheting, don’t worry — that’s completely normal. A gentle blocking at the end will help everything relax into shape.
Main Body
Using light pink yarn
Round 1
Make a MR.
Work 6 sc into the ring.
Join with sl st to first sc.
(6)
Round 2
Ch 1.
Inc in each st around.
Join with sl st.
(12)
Round 3
Ch 1.
1 sc, inc around.
Join with sl st.
(18)
Round 4
Ch 1.
2 sc, inc around.
Join with sl st.
(24)
Round 5
Ch 1.
3 sc, inc around.
Join with sl st.
(30)
Round 6
Ch 1.
4 sc, inc around.
Join with sl st.
(36)
Round 7
Ch 1.
5 sc, inc around.
Join with sl st.
(42)
Round 8
Ch 1.
6 sc, inc around.
Join with sl st.
(48)
Round 9
Ch 1.
7 sc, inc around.
Join with sl st.
(54)
Round 10
Ch 1.
8 sc, inc around.
Join with sl st.
(60)
Round 11
Ch 1.
9 sc, inc around.
Join with sl st.
(66)
Round 12
Ch 1.
10 sc, inc around.
Join with sl st.
(72)
Round 13
Ch 1.
11 sc, inc around.
Join with sl st.
(78)
FO and weave in ends.
Snout
Using dark pink yarn
Round 1
Make a MR.
Work 6 sc into the ring.
Join with sl st.
(6)
Round 2
Ch 1.
Inc in each st around.
Join with sl st.
(12)
Round 3
Ch 1.
1 sc, inc around.
Join with sl st.
(18)
Round 4
Ch 1.
Sc around evenly.
Join with sl st.
(18)
FO leaving a long tail for sewing.
Ears (Make 2)
Using dark pink yarn
Row 1
Ch 4.
Sc in 2nd ch from hook and across.
(3)
Row 2
Ch 1, turn.
Inc, 1 sc, inc.
(5)
Row 3
Ch 1, turn.
Sc across.
(5)
Change to light pink yarn.
Work sc evenly around the ear edge to create a border.
FO leaving a tail for sewing.
Legs (Make 4)
Using dark pink yarn
Round 1
MR, 6 sc in ring.
(6)
Change to light pink yarn.
Round 2
Sc around.
(6)
FO leaving a tail for sewing.
Lightly flatten each leg before attaching.
Tail
Using light pink yarn
Ch 12.
Work 2 sc in each chain across to create a curl.
FO leaving a tail for sewing.
Assembly
This is where the personality of your pig coaster really starts to come to life. Take your time with placement and don’t be afraid to pin pieces first before sewing permanently.
Attach the Snout
Center the snout on the front of the body approximately between Rounds 4–8.
Sew securely in place.
Add the Eyes
Attach safety eyes just above the snout with approximately 8 stitches between them.
If preferred, embroider sleepy eyes instead.
Embroider the Nose
Using black yarn, embroider two vertical nostrils onto the snout.
Add the Smile
Embroider a small curved smile beneath the snout using black yarn.
Sew the Ears
Attach ears at the top edge of the coaster, slightly angled outward.
Sew the Legs
Attach four legs evenly along the bottom edge.
Attach the Tail
Sew the curly tail onto the back-right side of the coaster.
Finishing Touches
Once everything is attached, gently flatten the coaster with your hands. If needed, lightly steam block it so the edges lay neatly flat.
One of the sweetest things about this crochet pig coaster pattern is how customizable it is. You can keep the classic pink look or experiment with different yarn shades for a more whimsical style.
Some crocheters even add tiny blush cheeks or embroidered eyelashes for extra charm.
Your finished pig coaster is perfect for:
- Coffee tables
- Tea trays
- Farmhouse kitchens
- Handmade gifts
- Craft fairs
- Desk décor
- Cute mug rugs
Tips & Variations
Want to make your crochet pig coaster even more unique? Here are a few fun ideas:
- Use pastel yarn for a softer kawaii-inspired style
- Add rosy cheeks using fabric-safe blush or chalk
- Turn it into a hanging decoration by adding a loop
- Make a matching farm animal coaster set
- Use chunky cotton yarn for a larger mug rug version
Helpful tip: Keeping your stitches tight will help the coaster maintain a smooth round shape and prevent stretching over time.
Why You’ll Love This Crochet Pig Coaster Pattern
This project is quick, relaxing, and unbelievably cute once assembled. It’s the kind of crochet piece that instantly brightens a room and makes everyday moments feel a little cozier.
Because the pattern uses simple stitches and repetitive rounds, it’s also a fantastic stash-busting project when you have leftover cotton yarn waiting to be used.
Whether you’re crocheting for yourself, preparing handmade gifts, or creating inventory for markets, this crochet pig coaster pattern is one of those projects people can’t resist smiling at.
FAQ – Crochet Pig Coaster Pattern
Is this crochet pig coaster pattern beginner-friendly?
Yes! This pattern uses basic stitches and simple shaping, making it ideal for confident beginners and relaxing for experienced crocheters.
What yarn works best for a crochet coaster?
Cotton yarn is the best choice because it absorbs moisture well and helps the coaster hold its shape.
Can I wash the pig coaster?
Absolutely. Hand washing is recommended to keep the details looking neat and prevent stretching.
Can I make this coaster larger?
Yes. You can continue increasing the main body rounds evenly if you’d like a larger mug rug size.
Are safety eyes necessary?
Not at all. Embroidered eyes work beautifully and are a great option if children will be using the coaster.
Conclusion
If you love cheerful handmade projects that are both practical and adorable, this Crochet Pig Coaster Pattern is such a fun one to add to your crochet list. It works up beautifully, uses simple techniques, and brings so much personality to even the smallest corner of your home.
Whether you keep it for yourself or gift it to another crochet lover, this sweet little pig is guaranteed to bring smiles.
Happy crocheting and enjoy every stitch!
Loved this pattern?
Share this Crochet Pig Coaster Pattern with your crochet friends and tag your finished creations online — handmade projects like this are too cute not to show off!