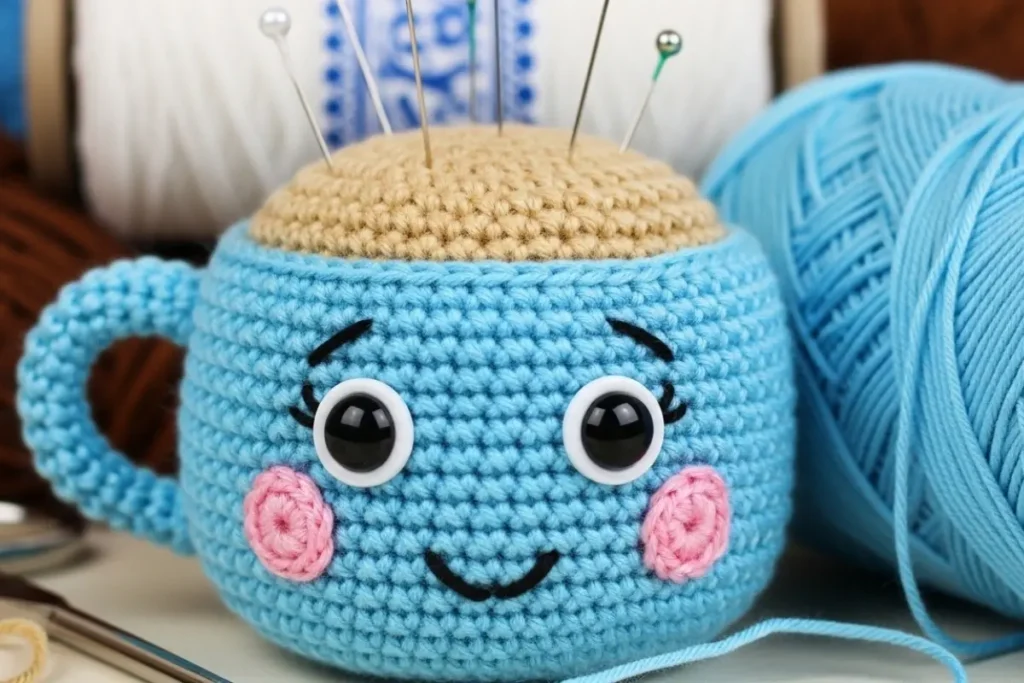
I’ve made this little teacup more than once, and every time it ends up stealing my attention while I’m working on it. There’s something incredibly satisfying about watching a simple round base turn into a cozy, smiling mug that looks like it belongs next to a real cup of tea. This Teacup Amigurumi Crochet Pattern was designed to feel calm and comforting from the first stitch to the final embroidered smile.
In real use, this piece works beautifully as a decorative shelf item, a needle holder, or a thoughtful handmade gift for tea lovers. I’ve gifted one to a friend who keeps it on her desk, and another lives permanently beside my own crochet tools holding stitch markers and needles.
When testing the pattern, I used a 1.5 mm hook with smooth merino yarn to keep the stitches tight and clean, especially around the rim detail. The project doesn’t take long to complete, but it feels intentional and polished — the kind of amigurumi that looks more complex than it actually is when finished.
What You’ll Need
Everything listed below comes directly from the original instructions — nothing extra, nothing altered.
Materials
-
Light blue merino yarn (cup)
-
Gray yarn (tea bag)
-
Camel or brown yarn (tea / liquid)
-
Cream or off-white yarn (cup interior, optional)
-
Small amount of black pearl cotton or black yarn (eyelashes, eyebrows, mouth)
-
Small amount of classic pink yarn (cheeks)
-
9 mm safety eyes
-
Fiberfill stuffing
-
Stitch marker
-
Yarn needle
-
Scissors
-
Crochet hook 1.5 mm
Pattern Information
-
Project Type: Amigurumi / Decorative Container
-
Technique: Worked in joined rounds and continuous rounds
-
Skill Level: Intermediate (multiple parts, assembly, embroidery)
-
Language: US Crochet Terms
-
Hook Size: 1.5 mm
-
Finished Size: Not specified
-
Gauge: Not specified
Abbreviations (US Terms)
| Abbreviation | Meaning |
|---|---|
| MR | Magic Ring |
| ch | Chain |
| sc | Single Crochet |
| inc | Increase (2 sc in same stitch) |
| dec | Decrease |
| sl st | Slip Stitch |
| st(s) | Stitch(es) |
| BLO | Back Loop Only |
Important Notes
-
Chains at the beginning of rounds do not count as stitches
-
Joined rounds are used unless stated otherwise
-
Stitch counts follow the spoken instructions exactly
-
No gauge, yarn weight, or size conversions were added
Teacup Amigurumi Crochet Pattern
Cup Base (Make 2 – Identical Pieces)
Round 1
MR
ch 1
6 sc into MR
sl st to first sc
(6 sts)
Round 2
ch 1
inc in each st around
sl st to first sc
(12 sts)
Round 3
ch 1
(1 sc, inc) repeat around
sl st to first sc
(18 sts)
Round 4
ch 1
(2 sc, inc) repeat around
sl st to first sc
(24 sts)
Round 5
ch 1
(3 sc, inc) repeat around
(30 sts)
Round 6
ch 1
(4 sc, inc) repeat around
(36 sts)
Round 7
ch 1
(5 sc, inc) repeat around
(40 sts)
Round 8
ch 1
(6 sc, inc) repeat around
(48 sts)
Round 9
ch 1
(7 sc, inc) repeat around
(54 sts)
Fasten off.
Make two identical bases.
Joining the Two Bases (Cup Thickness)
-
Place the two bases wrong sides together
-
Using yarn needle, sew through alternating stitches around
-
Do not pull too tight to avoid warping
-
Knot invisibly and hide yarn tail inside
Cup Body
Attach blue yarn in back loop only of the top base.
Round 10
ch 1
sc in BLO around
sl st to first sc
(54 sts)
Rounds 11–24
ch 1
sc in both loops around
sl st to first sc
(54 sts each round)
Rim Detail (Lip of the Cup)
Round 25
ch 1
Insert hook between previous rounds (creating elongated stitches)
Pull up loop, complete sc
Repeat in each stitch around
sl st to first sc
Fasten off.
Stuffing
-
Lightly stuff the cup
-
Shape wider at the top and narrower at the bottom
-
Aim for a soft, rounded mug silhouette
Tea / Liquid Surface
Worked in continuous rounds.
Round 1
MR
6 sc
Place marker
(6 sts)
Round 2
inc in each st
(12 sts)
Round 3
(1 sc, inc) repeat around
(18 sts)
Continue following the exact same increases as the cup base until it matches the cup opening size.
Fasten off with long tail.
Attach Liquid to Cup
-
Sew just below the rim detail
-
Leave no gaps
-
Secure and hide all ends
Cup Handle
Round 1
ch 8
sl st to first ch to form ring
(8 sts)
Rounds 2–17
ch 1
sc in each st around
sl st to first sc
(8 sts each round)
Fasten off with long tail.
Handle Stuffing & Attachment
-
Insert small pieces of fiberfill using a larger hook
-
Shape gently
-
Fold handle into a curved shape
-
Sew securely to the side of the cup
Cheeks (Make 2)
Round 1
MR
ch 2
8 hdc into ring
sl st to second ch
Fasten off with long tail
Sew below eyes.
Face Details
Eyes
-
Insert 9 mm safety eyes
-
Space 6 stitches apart
Eyelashes
-
Embroider with black yarn
-
Insert behind the eye and pull out slightly above
-
Repeat symmetrically
Eyebrows
-
Small embroidered lines above eyes
-
Slight upward curve
Mouth
-
Simple embroidered curve centered between cheeks
Tea Bag
Round 1
ch 7
Starting in 2nd ch from hook:
sc 5
3 sc in last ch
Continue on opposite side: sc 5
sl st to first sc
(14 sts)
Rounds 2–4
ch 1
sc in each st around
(14 sts)
Round 5
ch 1
dec
sc 5
dec
sc 5
(12 sts)
Rounds 6–7
ch 1
(sc 1, dec) repeat as spoken
sl st to first sc
Fasten off.
Tea Bag String
-
Attach yarn
-
sl st up side of cup
-
ch 9
-
Fasten off
-
Sew string to cup rim
Finishing Touches
-
Weave in all ends neatly
-
Adjust stuffing if needed
-
Gently shape with your hands
Final Result
A sweet teacup amigurumi mascot, perfect as:
-
Decorative shelf piece
-
Pin holder
-
Needle holder
-
Handmade gift for tea lovers
My Experience & Practical Tips
After making this teacup a few times and adjusting small habits rather than the pattern itself, a few practical things really stood out:
-
Watch your tension on the base rounds. The two identical cup bases look best when your tension is consistent. If one base comes out looser than the other, you’ll notice it when sewing them together. I recommend slowing down slightly on the increase rounds to keep everything even.
-
Don’t overstuff the cup. This is a common beginner mistake. The cup should feel softly supported, not firm. Overstuffing will push the stitches apart and distort the rim detail. I add stuffing gradually and stop once the cup holds its shape without resistance.
-
Use smaller bits of fiberfill for the handle. Instead of pushing in one large piece, feed in tiny amounts using a hook. This keeps the handle smooth and flexible, making it much easier to shape naturally before sewing it onto the cup.
-
Take your time with the face placement. Before securing the safety eyes or embroidery, I always pin or lightly mark the positions. A single stitch difference can change the expression, and this teacup really shines when the face feels balanced and relaxed.
-
The tea surface should sit just below the rim. Sewing it too high hides the rim detail, while sewing it too low leaves an awkward gap. I align it visually first, then stitch slowly to keep it even all the way around.
FAQ – Teacup Amigurumi Crochet Pattern
Q: Is this pattern beginner-friendly?
A: It’s best for confident beginners or intermediate crocheters due to assembly and embroidery.
Q: Can I change yarn size or hook?
A: You can, but the finished size and stiffness will change.
Q: Is the teacup functional?
A: It’s decorative, but works beautifully as a needle or pin holder.
Q: Can I sell finished pieces?
A: Yes, handmade items are typically allowed — just don’t redistribute the pattern itself.
If you enjoy small, expressive amigurumi like this teacup, you might also like the Mini Octopus Crochet Pattern, which is great for practicing clean shaping and facial embroidery on a tiny scale. For quick gifts or craft fair ideas, the Summer Fruit Crochet Keychains work up fast and pair beautifully with this teacup as a themed set. And if you’re in the mood for something playful and character-based, the Garfield Keychain Crochet Pattern adds a fun pop of personality to your handmade collection.
This teacup pattern was carefully tested to make sure it holds its shape, feels good in the hands, and looks charming from every angle. It’s one of those projects that feels just as enjoyable to make as it is to display, whether you keep it for yourself, gift it to a fellow tea lover, or include it in a small handmade collection.
I love patterns like this because they fit naturally into everyday crochet life — something you can finish in a calm afternoon, personalize with color choices, and actually use afterward. If you decide to make one, I hope it brings you the same quiet joy it brings me every time I see that little smile looking back from my shelf.
And yes — this one really is best enjoyed with a real cup of tea nearby. ☕🧶