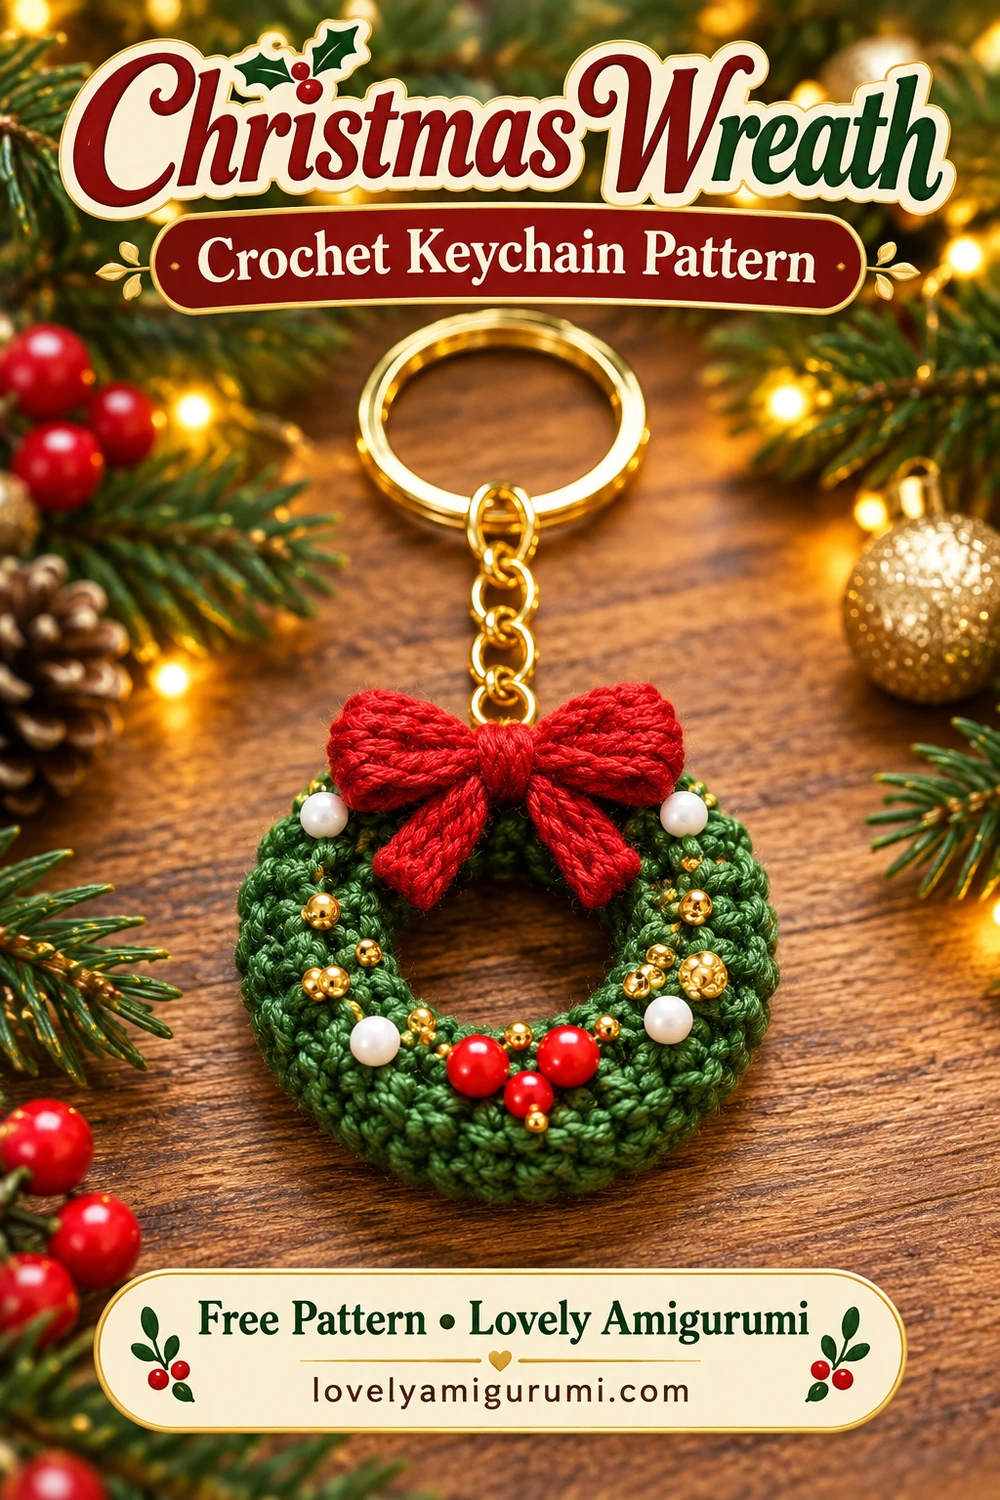
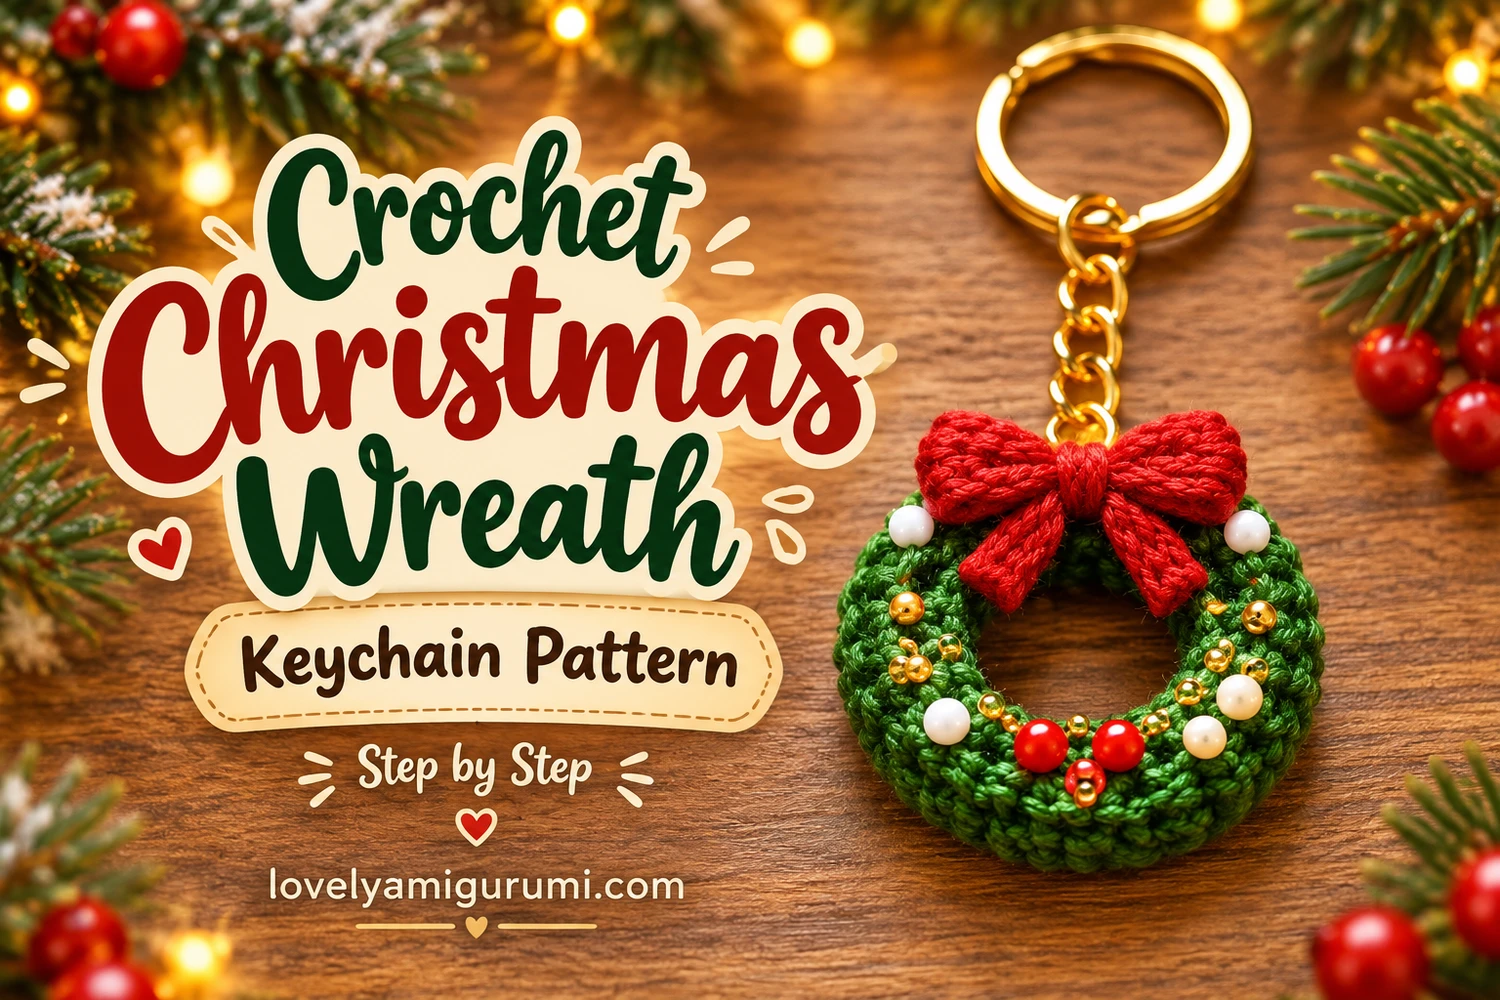
This Christmas Wreath Crochet Keychain Pattern turns a little green ring into a festive charm with a red yarn bow, white and red beads, tiny gold accents, and a gold keyring. The design follows the supplied reference: a plump crochet wreath with an open center and the bow sitting at the top.
Make one as a seasonal bag charm, a stocking-stuffer decoration, or a handmade gift topper. The pattern uses a small stuffed crochet tube joined into a ring, so the wreath has a rounded profile on both sides.
Pattern Information
- Skill level: Confident beginner, with basic sewing and bead attachment.
- Terms: US crochet terminology.
- Construction: An eight-stitch tube worked in a spiral, lightly stuffed, then sewn into a circle.
- Estimated size: About 4–5 cm across with fine cotton yarn. The exact size depends on your yarn, hook, and tension.
- Design details: Green ring, bundled red yarn bow, three red beads along the bottom, scattered white beads and gold accents, and gold hardware.
Pattern note: This is an image-inspired adaptation. Stitch counts have been checked, but the pattern has not been physically crocheted or independently tested. The images illustrate the design and construction; they are not photographs of a tested sample.
Materials for the Christmas Wreath Crochet Keychain
- Fine cotton yarn in green, approximately 5–10 g as a starting allowance.
- A small amount of red cotton yarn for the bow and its two tails.
- A 2–2.5 mm hook as a starting point; choose a size that makes dense stitches.
- A small amount of fiberfill.
- Three red round beads, approximately 3–4 mm, and five white round beads, approximately 2–3 mm.
- Approximately 8–12 small gold seed beads or similarly sized sew-on accents.
- Strong sewing thread in a coordinating color and a needle that fits through the bead holes.
- A tapestry needle, scissors, and a stitch marker.
- A gold keyring with a short chain and connector ring or clasp.
- A small card approximately 2 cm wide for winding the bow.
Choose bead sizes that suit the finished ring. Keep the ornaments small enough to show the green stitches and the open center. This beaded version is a decorative accessory with small parts.
Stitches and Abbreviations
| Abbreviation | Meaning |
|---|---|
| ch | chain |
| sc | single crochet |
| sl st | slip stitch |
| st(s) | stitch(es) |
| R | round |
Numbers in brackets show the completed stitch count. The turning chain and joining slip stitch are not counted. No increases or decreases are needed for the tube.
Before You Begin
The wreath is made from a narrow tube, not from a flat circle with a filled center. Both ends of the tube stay open until they are sewn together. Use the marker to track the first stitch, and work continuously after Round 1 without joining or turning.
Keep your stitches dense enough to hide the filling, but avoid making the fabric stiff. A soft tube will bend smoothly into a circle. The center should stay clearly open after you add the bow and beads.
Christmas Wreath Crochet Keychain Pattern
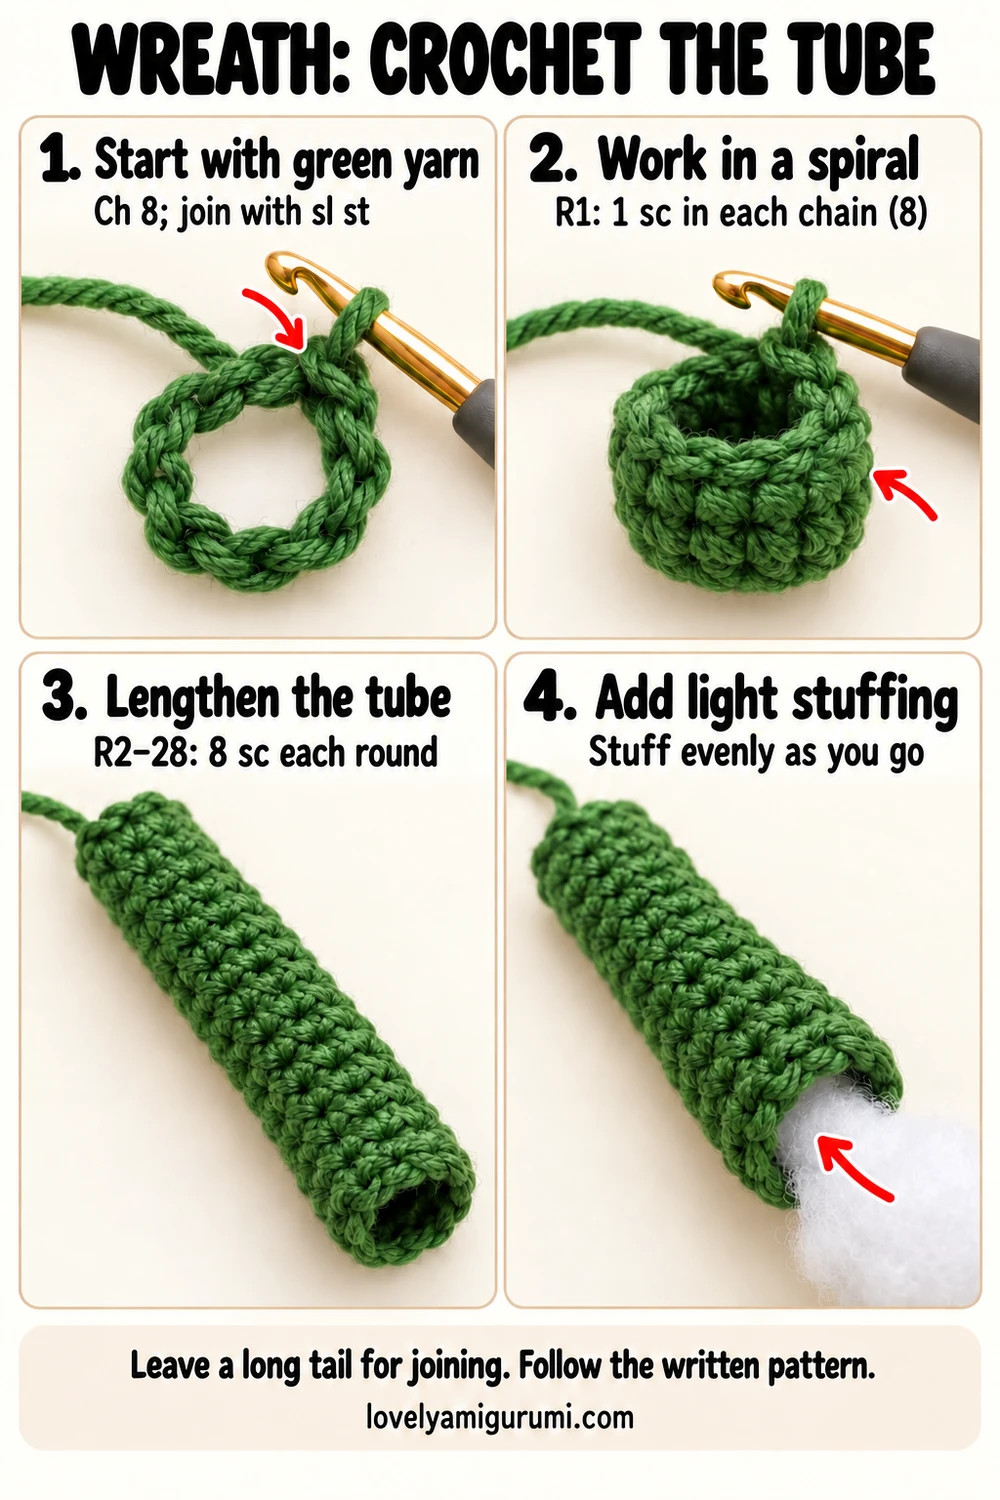
1. Start the Green Tube
With green, ch 8. Check that the chain is not twisted, then sl st into the first chain to make a small ring. Leave a starting tail of about 10 cm for weaving in later.
Round 1: Ch 1, then work 1 sc into each of the 8 foundation chains. [8]
Do not work the stitches into the center hole. Working into each chain keeps an open tube end with eight stitches to match when joining. Mark the first sc. Continue directly into Round 2.
2. Crochet and Lightly Stuff
Rounds 2–28: Sc in every stitch around. [8 per round; 27 rounds]
Add small wisps of filling as the tube grows. Use the blunt end of a tool gently if needed, taking care not to stretch the stitches. The tube should feel evenly padded and flexible rather than hard. Leave the final round without tightly packed filling so the edges can be sewn neatly.
Before fastening off, curve the tube into a circle and bring the two ends together. The 28-round length is a starting point: if the center collapses or the tube cannot bend easily, remove some filling. If needed, add plain rounds until the two ends meet comfortably around an open center. Each additional round still has 8 sc.
Sl st into the next stitch to smooth the end. This slip stitch is not an extra stitch in Round 28. Fasten off, leaving a 25–30 cm tail for joining.
3. Join the Tube into a Wreath
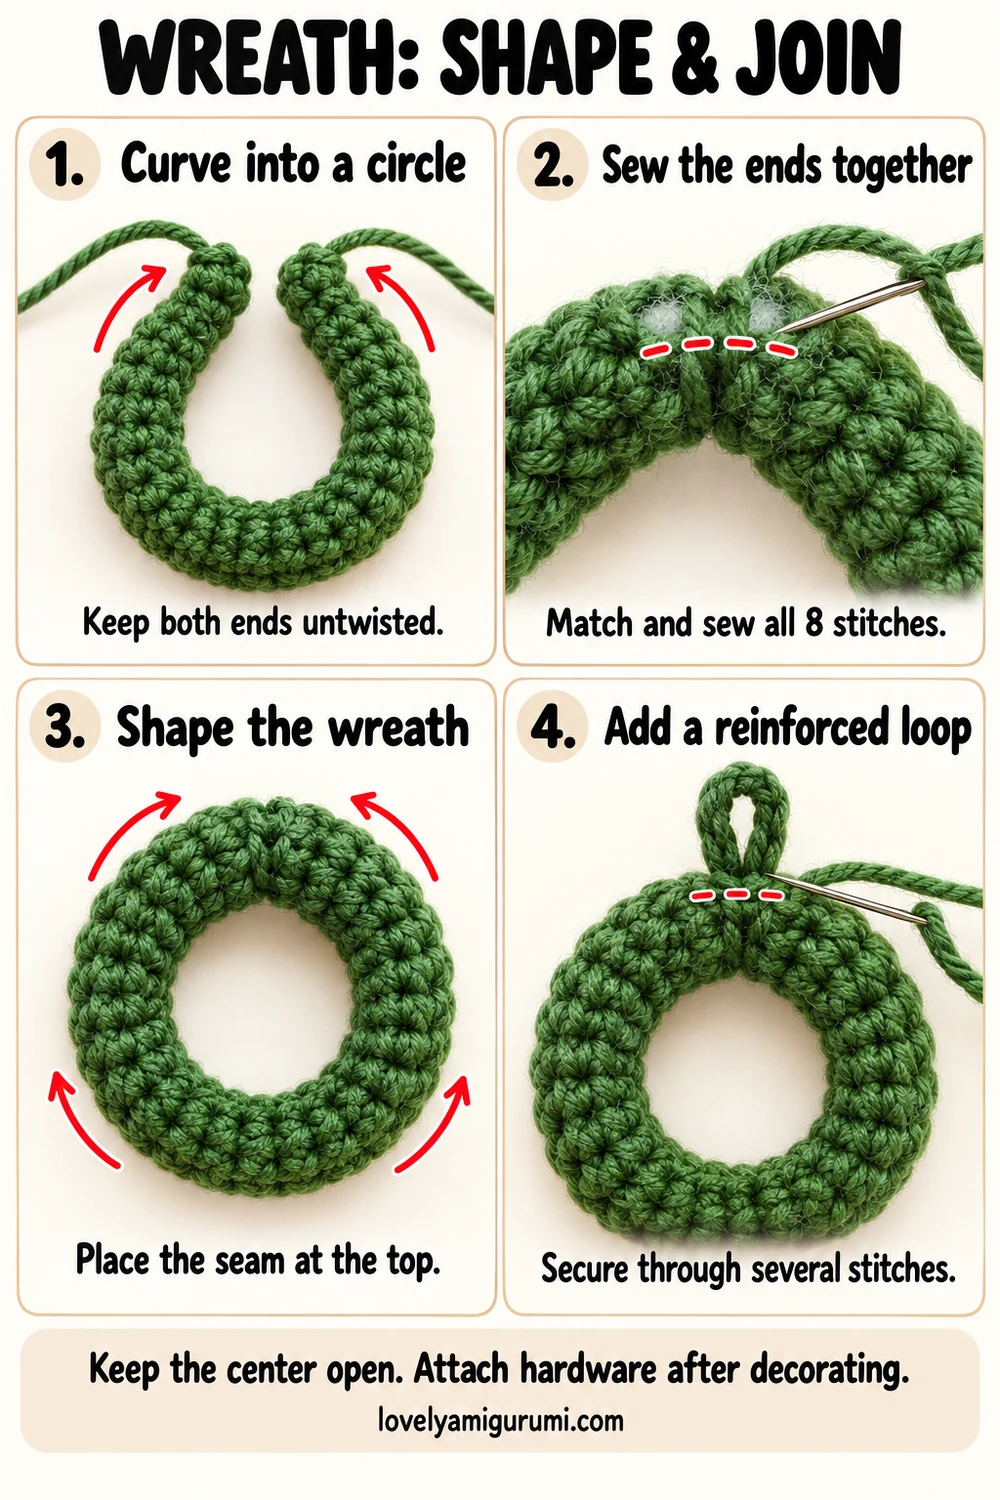
Weave the short starting tail into the inside of the tube without closing the opening. Curve the tube into a circle with the right side facing outward. Align the two open ends without twisting the fabric, and match the eight stitches at one end to the eight foundation stitches at the other.
Thread the long green tail onto a tapestry needle. Whipstitch through the two matching edges, pairing one stitch from each end at a time. Before closing the last small gap, check the filling at the join and add only enough to prevent a hollow spot. Complete the seam, secure the thread, and hide the tail inside the tube.
Massage the wreath into an even circle. Place the seam at 12 o’clock, where the red bow will cover it. Keep the center open and the front and back softly rounded.
Make the Red Yarn Bow
1. Wind the Bow Loops
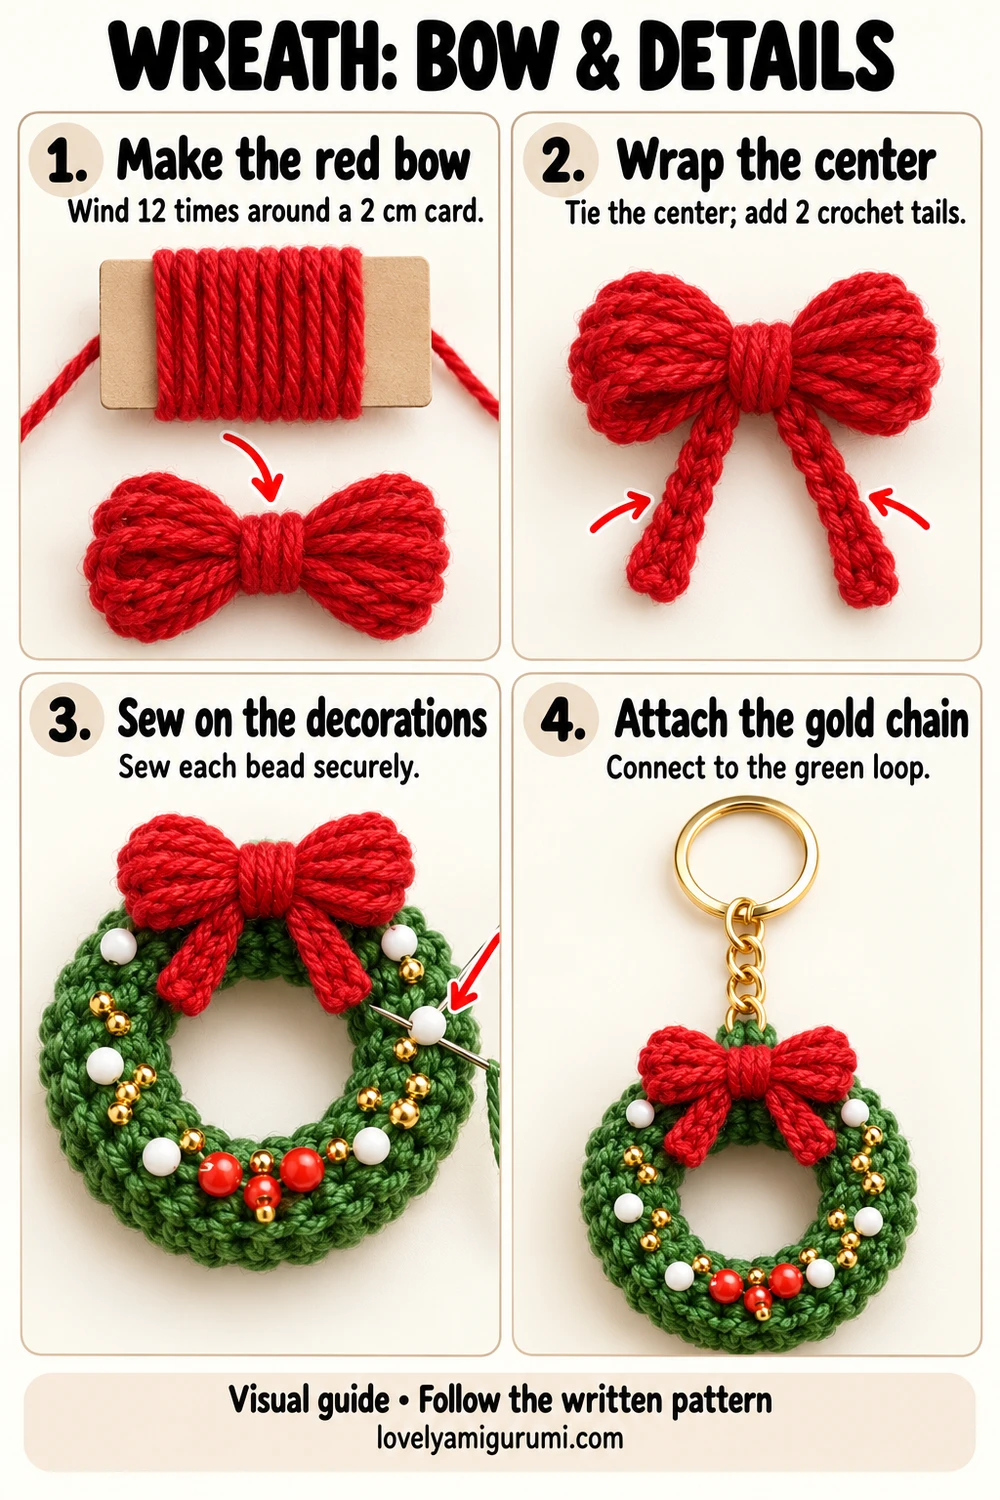
The main bow is made from bundled yarn to echo the visible strands in the reference. Wrap red yarn around a 2 cm-wide card approximately 12 times, keeping the wraps close together without pulling tightly. Cut the working yarn and slide the bundle off the card carefully. Do not cut either folded end of the bundle.
Pinch the bundle at its midpoint. Tie a fresh 20 cm length of red yarn tightly around the center, then wrap it around the center three or four more times. Secure the wrapping on the back with a knot. Leave these ends long for attaching the bow. Spread the two folded ends into two rounded bow loops.
2. Crochet Two Narrow Tails
Make 2: With red, ch 7. Starting in the second chain from the hook, sc in each of the next 6 chains. [6]
Fasten off, leaving a sewing tail. Attach one end of each strip to the back of the bow’s center, angling the strips slightly outward so they hang as two separate tails. Hide the remaining ends behind the bow. Adjust the tail lengths or the card width if your yarn makes a larger bow than the wreath needs.
3. Sew the Bow at the Top
Position the bow over the top seam. Sew the center securely through several green stitches using the red attachment ends. Keep the two loops above the center opening, with the tails hanging a short distance onto the green ring. Avoid stretching the bow across the whole opening.
Add the White, Red, and Gold Details
Arrange three red beads along the lower front arc of the wreath. Add five white beads around the remaining front arc, then place small gold beads in the spaces between them. This placement captures the reference without covering every stitch. The exact spacing can vary with your ring size.
Use strong sewing thread and a fine needle. For each bead, pass the needle through a secure section of the green fabric, through the bead hole, and back into the fabric. Repeat the attachment two or three times, then secure the thread inside the tube. Keep long exposed thread spans off the back. Repeat for every decoration and check that each bead stays in place with a gentle tug.
If you prefer a bead-free version, embroider small red, white, and gold spots onto the front with yarn. The green ring and red bow remain the same.
Attach the Gold Keychain
Use a fresh length of green yarn doubled to sew a short reinforced loop at the center back of the top seam, behind the bow. Pass through several stitches on both sides of the seam and repeat the stitching at least three times to spread the pull. Keep the loop only large enough for your connector.
Connect the gold chain’s clasp or connector ring to the green loop. The chain should rise behind the bow, with the round keyring above the wreath. Secure and hide all yarn ends, then check the attachment with a gentle pull.
Three Visual Tutorials
The three guides in the final gallery show the green tube, shaping and joining the ring, and adding the bow, beads, and hardware. Follow the numbered panels for an overview and the written directions for complete stitch placement. The construction images are illustrative.
Practical Tips and Troubleshooting
The ring looks lumpy
Use smaller amounts of filling and distribute them evenly before joining. Gently roll the tube between your fingers. Avoid a hard lump at the seam.
The center hole is too small
Reduce the stuffing first. If the tube is still too short to curve comfortably, add plain eight-stitch rounds before fastening off. Match the ends without pulling them together under tension.
The bow hides the wreath
Use a narrower winding card or fewer wraps. Keep the bow’s tails short and place the center at the top seam.
The joining seam is visible
Match the eight edge stitches carefully and use green yarn of the same shade. Put the seam beneath the bow.
FAQ
Can I use a darker green?
Yes. A deep green or a softly varied green follows the reference well. Keep the bow red and use gold hardware for the same festive finish.
Can this be a tree ornament?
Yes. Replace the keyring and chain with a hanging cord attached to the reinforced green loop.
Can I make it larger?
Use thicker yarn and a matching hook, then check the tube length before joining. The bow and beads should be scaled to the finished wreath.
More Free Crochet Patterns
- Red Gift Bag Crochet Keychain Pattern
- Christmas Penguin Keychain Crochet Pattern
- Santa Ornament Crochet Pattern
Save This Pattern
Save this Christmas Wreath Crochet Keychain Pattern to your Pinterest crochet board for your next festive project. Happy crocheting from Lovely Amigurumi!
Christmas Wreath Visual Tutorials and Pinterest Gallery
Keep these three visual tutorial guides and three Pinterest images together for your next crochet session.