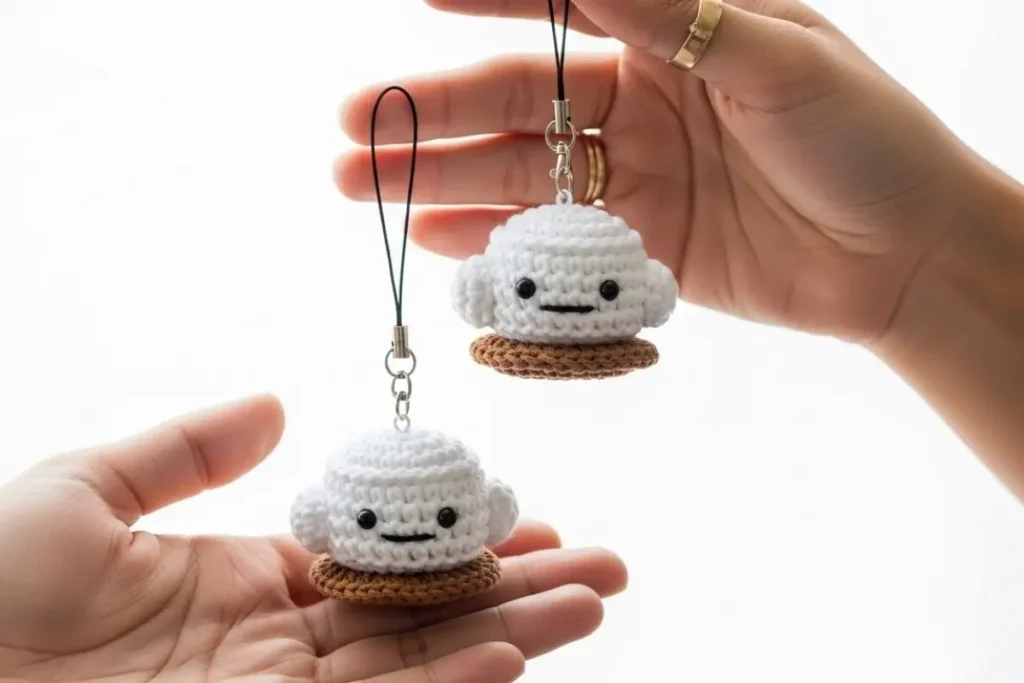
I’ve made this Coffee Cup Keychain Amigurumi more times than I can count, and it’s one of those tiny projects that never fails to make people smile. It works up quickly, uses very little yarn, and always turns out sturdy enough to survive daily life on keys or backpacks — which is exactly what I look for in a keychain design.
What I love most about this pattern is how beginner-friendly it feels without looking “basic.” The shaping is simple, but the finished cup has a clean silhouette and enough personality to stand on its own. I tested it with sport and light DK yarn, keeping the hook size slightly smaller than usual to get a firm fabric, and each one took me well under an hour once I got into the rhythm.
Whether you’re making a last-minute gift, adding a cute item to your craft fair table, or just want a relaxing mini amigurumi project, this little coffee cup is a joy from start to finish ☕
Tutorial Pattern: Coffee Cup Keychain Amigurumi
🧶 What You’ll Need
To crochet your Coffee Cup Keychain Amigurumi, gather these materials:
-
Yarn (sport / light DK recommended)
(Example: YarnArt Jeans, as used in the video)-
Color A: Cup (white or any light color)
-
Color B: Coffee (brown)
-
-
Crochet Hooks
-
1.9 mm – cup body
-
1.75 mm – coffee top & handle
-
-
Small amount of fiberfill stuffing
-
Tapestry needle
-
Scissors
-
Stitch marker or contrasting yarn
-
Black embroidery floss (for face details)
Optional Extras
-
Plastic amigurumi eyes (glued)
-
Keychain base
📏 Finished Size
-
Approx. 6–7 cm (2.3–2.7 in) tall
(Size may vary depending on yarn tension and hook choice)
Perfect mini scale for keychains and bag charms.
✂️ Abbreviations (US Terms)
| Abbreviation | Meaning |
|---|---|
| MR | Magic Ring |
| sc | Single crochet |
| inc | Increase (2 sc in same stitch) |
| sl st | Slip stitch |
| st(s) | Stitch(es) |
| BLO | Back loop only |
🧵 Pattern Notes
-
This Coffee Cup Keychain Amigurumi is worked in continuous rounds (spiral).
-
Use a stitch marker to track rounds easily.
-
Stuff lightly to keep the cup shape neat and firm.
-
Do not change stitch counts — consistency ensures the perfect fit when joining pieces.
☕ Coffee Cup Keychain Amigurumi – Pattern (US Terms)
🫖 CUP BODY (Color A – Cup)
Bottom
Round 1
6 sc in MR (6)
Round 2
inc in all sts (12)
Round 3
inc in all sts (24)
Side Wall (BLO)
Round 4
sc in BLO around (24)
Expanding the Cup
Round 5
(3 sc, inc) × 6 (30)
Round 6
(4 sc, inc) × 6 (36)
Upper Wall
Rounds 7–12
sc in all sts (36)
6 rounds total
➡️ You may add or remove rounds here to adjust cup height.
Edge Finish
Round 13
sl st around
➡️ Do NOT cut yarn.
Leave the working yarn attached — it will be used to join the coffee part later.
Set cup aside.
☕ COFFEE TOP (Color B – Coffee)
Use smaller hook (1.75 mm)
Round 1
6 sc in MR (6)
Round 2
inc in all sts (12)
Round 3
inc in all sts (24)
Round 4
(3 sc, inc) × 6 (30)
Round 5
(4 sc, inc) × 6 (36)
Finish Coffee Edge
sl st
Fasten off
Flatten edge using needle as shown in video
Weave in ends
🔗 JOIN CUP & COFFEE
Using the remaining yarn from the cup:
Insert hook through:
-
One stitch of the cup
-
One back loop only of the coffee piece
sc to join
Repeat around, joining all stitches.
⚠️ Before closing completely:
➡️ Stuff the cup lightly.
Finish joining the round, fasten off, knot securely, and weave in ends.
🪝 HANDLE (Color A – Cup)
Use smaller hook (1.75 mm)
Round 1
5 sc in MR (5)
Rounds 2–8
sc in all sts (5)
7 rounds total
Fasten off, leave long tail for sewing.
🧵 Attach Handle
-
Sew one end to one side of the cup
-
Sew the other end slightly lower on the opposite side
-
Secure firmly and hide ends
😊 FACE DETAILS (Optional)
Eyes:
Glue plastic amigurumi eyes
Placement:
Between 3rd and 4th round from the top
4 stitches apart
Embroidery:
-
Eyebrows: black floss
-
Smile: small curved stitches
Knot and hide all ends inside
✨ Finishing Touches
-
Attach a keychain base if desired
-
Gently shape the cup with your fingers
-
Adjust stuffing for a smooth finish
Your Coffee Cup Keychain Amigurumi is now ready to go everywhere with you ☕💛
💡 Tips & Variations
-
Try pastel cups for a café-style collection
-
Add whipped cream or foam stitches on top
-
Skip the face for a minimalist look
-
Use cotton yarn for a firmer texture
This pattern is perfect for selling finished items at craft fairs or gifting to coffee lovers.
❓ FAQ – Coffee Cup Keychain Amigurumi
Q: Is this pattern suitable for beginners?
Yes! This Coffee Cup Keychain Amigurumi uses basic stitches and simple shaping.
Q: Can I use a different yarn weight?
You can, but the size will change. Stick to sport/DK for the best result.
Q: Can I sell the finished item?
Yes, handmade items are usually fine — just don’t resell the pattern itself.
Q: Do I have to add a face?
Not at all. The cup looks adorable with or without facial details.
If you enjoy small, giftable projects like this one, you might also like my Mini Apple Amigurumi Crochet Pattern, which is just as quick to make and perfect for keychains or teacher gifts. For a matching cozy vibe, the Teacup Amigurumi Crochet Pattern pairs beautifully with this coffee cup, especially if you enjoy creating themed sets. And if you’re in the mood for something playful, the Mini Octopus Crochet Pattern is another fast project that’s great for using up leftover yarn.
This Coffee Cup Keychain Amigurumi is a pattern I keep coming back to because it’s reliable, tested, and genuinely fun to make. Every step has been worked and reworked to ensure the pieces fit together smoothly and hold their shape over time.
It’s a lovely choice for handmade gifts, stocking fillers, craft fairs, or simply adding a little handmade charm to your own keys or bag. However you use it, I hope it brings you the same quiet joy I get every time I finish one and hold that tiny cup in my hand.
Happy crocheting — and enjoy every stitch ☕💛